들어가며
Clang을 이용하여 Refactoring Tool을 만들어 보려 한다. 직장인인지라 얼마나 걸릴진 모르지만 시간나는데로 틈틈히 진행해 볼 생각이다.
우선 AST (Abstract Syntax Tree) 구조에 대해 친숙해져야 할 듯 하다. 그래야 내가 Refactoring하고자 하는 code에 접근할 수 있으니 말이다.
Sample Code
우선 다음과 같은 간단한 코드를 준비했다.
#include <iostream>

class Person
{

public:
    int m_gender;

    static const char MALE;
    static const char FEMALE;

private:
    int m_age;

};

const char Person::MALE = 'M';
const char Person::FEMALE = 'F';

int main(int argc, char* argv[])
{
    Person a;

    a.set_age(10);
    a.get_age();

    a.m_gender = Person::MALE;
}
-ast-dump로 AST 확인하기
clang의 ast-dump 옵션을 이용하여 AST를 콘솔에 출력해 볼 수 있다. Text 기반이라 내용 해석이 어려울 수 있다. 위 예제 코드에 대한 결과는 다음과 같다.
$ clang++ -cc1 -ast-dump test.cc
test.cc:1:10: fatal error: 'iostream' file not found
#include <iostream>
         ^
TranslationUnitDecl 0x55da910 <<invalid sloc>> <invalid sloc>
|-TypedefDecl 0x55dae50 <<invalid sloc>> <invalid sloc> implicit __int128_t '__int128'
|-TypedefDecl 0x55daeb0 <<invalid sloc>> <invalid sloc> implicit __uint128_t 'unsigned __int128'
|-TypedefDecl 0x55db270 <<invalid sloc>> <invalid sloc> implicit __builtin_va_list '__va_list_tag [1]'
|-CXXRecordDecl 0x55db2c0 <test.cc:3:1, line:15:1> line:3:7 class Person definition
| |-CXXRecordDecl 0x55db3d0 <col:1, col:7> col:7 implicit class Person
| |-AccessSpecDecl 0x55db460 <line:6:1, col:7> col:1 public
| |-FieldDecl 0x55db4a0 <line:7:5, col:9> col:9 referenced m_gender 'int'
| |-VarDecl 0x55db500 <line:9:5, col:23> col:23 referenced MALE 'const char' static
| |-VarDecl 0x55db570 <line:10:5, col:23> col:23 FEMALE 'const char' static
| |-AccessSpecDecl 0x55db5d0 <line:12:1, col:8> col:1 private
| |-FieldDecl 0x5614c10 <line:13:5, col:9> col:9 m_age 'int'
| |-CXXConstructorDecl 0x5615290 <line:3:7> col:7 implicit used Person 'void (void)' inline noexcept-unevaluated 0x5615290
| | `-CompoundStmt 0x5615590 <col:7>
| |-CXXConstructorDecl 0x56153f0 <col:7> col:7 implicit Person 'void (const class Person &)' inline noexcept-unevaluated 0x56153f0
| | `-ParmVarDecl 0x5615530 <col:7> col:7 'const class Person &'
| |-CXXMethodDecl 0x5615660 <col:7, <invalid sloc>> col:7 implicit operator= 'class Person &(const class Person &)' inline noexcept-unevaluated 0x5615660
| | `-ParmVarDecl 0x5615780 <col:7> col:7 'const class Person &'
| `-CXXDestructorDecl 0x5615800 <col:7> col:7 implicit ~Person 'void (void)' inline noexcept-unevaluated 0x5615800
|-VarDecl 0x5614ca0 parent 0x55db2c0 prev 0x55db500 <line:17:1, col:27> col:20 referenced MALE 'const char'
| `-CharacterLiteral 0x5614d40 <col:27> 'char' 77
|-VarDecl 0x5614de0 parent 0x55db2c0 prev 0x55db570 <line:18:1, col:29> col:20 FEMALE 'const char'
| `-CharacterLiteral 0x5614e80 <col:29> 'char' 70
`-FunctionDecl 0x5615150 <line:20:1, line:28:1> line:20:5 main 'int (int, char **)'
  |-ParmVarDecl 0x5614f00 <col:10, col:14> col:14 argc 'int'
  |-ParmVarDecl 0x5615040 <col:20, col:31> col:26 argv 'char **':'char **'
  `-CompoundStmt 0x5615b08 <line:21:1, line:28:1>
    |-DeclStmt 0x56155d8 <line:22:5, col:13>
    | `-VarDecl 0x5615210 <col:5, col:12> col:12 used a 'class Person'
    |   `-CXXConstructExpr 0x56155a8 <col:12> 'class Person' 'void (void)'
    `-BinaryOperator 0x5615a28 <line:27:5, col:26> 'int' lvalue '='
      |-MemberExpr 0x5615958 <col:5, col:7> 'int' lvalue .m_gender 0x55db4a0
      | `-DeclRefExpr 0x5615930 <col:5> 'class Person' lvalue Var 0x5615210 'a' 'class Person'
      `-ImplicitCastExpr 0x5615a10 <col:18, col:26> 'int' <IntegralCast>
        `-ImplicitCastExpr 0x56159f8 <col:18, col:26> 'char' <LValueToRValue>
          `-DeclRefExpr 0x56159c0 <col:18, col:26> 'const char' lvalue Var 0x5614ca0 'MALE' 'const char'
1 error generated.
iostream을 못 찾는다는 에러가 나오지만 AST 내용을 보는덴 문제가 안 된다. (나의 능력으로는 iostream 관련 에러 메시지는 없앨 수 없었다.) -cc1은 clang의 옵션으로서 preprocessing만 하라는 의미 같다. 정확히는 -ast-dump는 -cc의 옵션이다. 2개를 항상 같이 사용해야 하며 순서도 바꿔서는 안 된다.
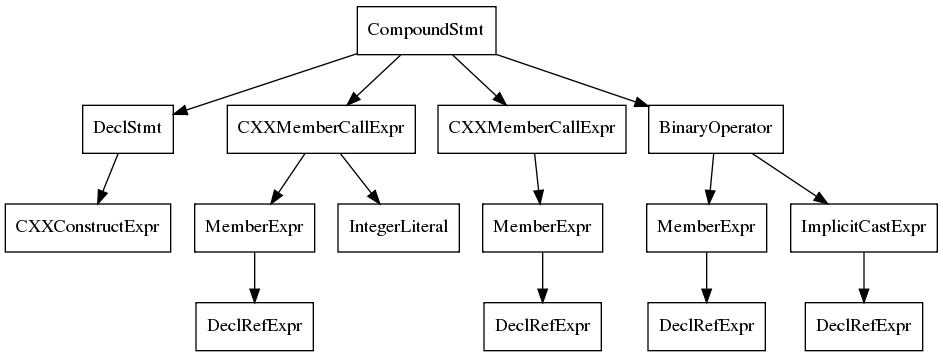
-ast-view 이용하기
며칠 전에 안 것이지만 (뭐 -ast-dump를 안 것도 얼마 안됨) -ast-view를 이용하면 AST를 그림으로 볼 수 있다. Graphviz를 이용하여 .dot 파일을 생성해 주며 .dot을 이용하여 각종 이미지 포맷으로 변경할 수 있다.
$ clang++ -cc1 -ast-view test.cc
$ ls /tmp/AST-xxx.dot
$ dot -Tpng /tmp/AST-xxx.dot -o ast-view.png
이제 이미지 뷰어로 ast-view.png를 열어 보면 다음과 같은 내용을 볼 수 있을 것이다.
경고 : 필자의 경우 -ast-view를 사용할 때 lynx가 수십개가 실행되면서 뭔가 장애 상황으로 빠졌다. lynx를 겨우 죽이고 /tmp/를 봤을 때 .dot 파일이 생성되긴 했었는데 잘 생성되지 않기도 했었다. 아마 생성된 파일을 lynx로 바로 보여주는 기능이 있는 듯 한데 뭔가 오류가 있는 듯 하다.
참고 : 그림에는 main() 하위의 AST만 보이고 Person 클래스에 대한 내용은 보이지 않는다. 원래 그런 것인지 아닌지는 아직 모르겠다.